“Ship shape and Bristol fashion”

“Ship shape and Bristol fashion”

Many have debated the origin of this expression- I don’t really care. I’m not usually so callous with language. In fact I’m rather a huge fan of how things are said and what meaning they carry. But I feel like with any art, what is observed from one person to the next can be different.

All I know is that I’m a fan of this expression for describing a boat, ship, or craft that has had lots of care put into its appearance and functionality.

I have acquired a 16’ sloop. Wooden hull with fiberglass sheathing, gaff rigged, with lovely lines. She is sound and just needs cosmetic work: sanding, painting, and a small amount of patching up fiberglass on her port rub rail.

My goal is clear to me- restore her, get her into the water and explore the lake. Maybe even coastal sailing after I have the feel of her and confidence to match.

This work would not be at all daunting to most, but I’ve never done it before. I know how to weld, and as far as carpentry I have attempted the obligatory spice rack as well as a rickety trestle table. However my trestle table and spice rack never had to worry about if they could float or not. My spice rack never had rigging or complicated lines to care for. My Trestle table never had a sail.

My deadline:

Late summer/early fall for initial refit completion and launch. To be certain- she is, as many are, a work in progress and I can see this work continuing on longer than this deadline.

Saturday, August 14, 2010

Refit week part 15,000,000 - the Varnishing


Last day of my vacation (well Sunday will be the last day, but who's counting). I spent some time re varnishing the mast and boom. I know - I have much more pressing things to be doing right now, but varnishing is so much fun (actually I think it is fun, how bad is that).
I still have to epoxy the rub rail in place, but I'm learning a bit more about epoxy before I go live on the boat. Good plan eh?
So this is not a complete shot as she doesn't have her bowsprit installed or any of her rigging (the board on top is just to keep the shape of the boat cover- not actually a mast- thankfully)
Here's a shot of her for now. I will my friend who previously owned her and see if he will mind if I post some shots of how she looked a few years back. I think it will be nice to see the progress getting back to her prime.

Refit week part 3- the rub of it


- sorry couldn't resist some Shakespeare wooden boat combination joke- how often do you get to do that anyway? The rub of it...hahahah... I know it's tacky to laugh at your own jokes, but oh well.
After some careful research and one phone call to my good friend (lets call him Jacques for fun). So Jacques and I talked about what wood would be useful to replace the rub rail. There are a lot of opinions on this out there- my god there are a lot of opinions. Some people say use teak (but only specially grown), mahogany, white oak, etc, etc, etc. Ash was the wood of choice that Jacques recommended. By the by Jacques is probably one of the cleverest folks I know and certainly being an engineer qualifies him to a great degree. So when he says use ash- damn right I use ash.
So I picked up a nice board of ash and promptly discovered that I don't have the right router bit to round the wood (that pesky round shape should be easier to come by than this). Thankfully I'm slightly clever myself and have the ability to work with hand tools- funny that. So with my trusty block plane I rounded the board and then trimmed it to length and width. Fairly happy with how it came out, almost looks store bought.
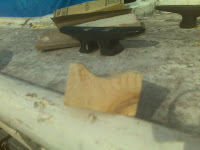
So now I'm up to the point where I need to install the rub rail, but I notice that my clamps just don't like to sit still on a rounded surface. I can fix that too (wow look at me go). So I routed out a rounded trench on a pine board and trimmed it to several small sections (1 1/2 inches long and about 2" wide give or take).
Here you will see two pics- one of the rail in place and one of the clamp adapters that I whipped up. I just didn't have time to epoxy it in place, but that might happen tomorrow.

Product Placement


Here's a pic of my currently employed products to get the boat running- Rot Fix feel free to sponsor me. I've certainly used enough of your product to qualify and will also most likely use it on my house as I've discovered a window sill that is in need of your fine product.
If I was smart I would have bought stock in System Three.
Anyway- just thought you might get some chuckles out of this.

Refit week part 2


The rot of ages. So the first day was spent building up the rotted area (starboard rub rail) some of the hull itself looked like it needed some love so I applied some structural filler. While I was doing this my good friend (whom in order to protect the innocent (HA HA) shall be called Edwardo from here on)... so as I was saying Edwardo was on the port side scraping loose paint. We put in a good couple of hours and then suddenly I heard a ripping sound followed by "Don't mind me or that horrible sound you hear" Edwardo was trimming out some delaminated fiberglass. MMMMMM fun. Well thankfully we found it then and as it so happens I've discovered that fiberglass is actually fairly cheap as things go- so trim away Edwardo! Just don't go too far with it- or I will have a raft and not a sailboat. Nice application of rot fix and should be ready for coating in fiberglass again.
I've included a photo of the area that was formerly rotten (starboard rub rail) and now pretty well built up. It took a while to dry for the next layer, but once dry I was able to fair it out nicely.

Refit week part 1

So I've had this past week off. My focus this past week has been solely on the boat. I had intended as usual to post every day with updates on my progress- well, intended and actually pulling it off are two separate things. So now that the week is over I've decided to post everything in a series of short posts.
Here goes nothing.